Showing posts with label Parties. Show all posts

Thursday, March 2, 2017

Moana Hawaiian Meal for Monday Funday


Becca here with a fun idea for a meal to go along with the Disney movie Moana that is coming out on DVD next week.  To decide if it's one your family wants to view, my two favorite sites to read reviews on are Common Sense Media and Focus on the Family's Plugged In.  My husband and I have been able to visit Hawaii a few times, and I was excited to share a small part of this unique culture, with a quick and easy meal, with the kids as part of our "Monday Funday".

We started the meal off talking a bit about how pineapples grow.  We were using canned pineapple slices for this meal, but get fresh pineapple often enough that the kids know what one looks like.  However, they were all surprised to learn that pineapple doesn't grow on a tree!  This is a cool video by Dole, showing exactly how pineapples are grown.  The kids loved that our pineapple was Dole brand also ;)

Next, we talked about Hawaii being the 50th state added to the United States, when their grandparents were about their ages, in 1959.  Hawaii also is the only place on US soil that has a royal palace!!  After the kids' questions about the palace and royalty exceeded my previous knowledge, we skimmed this article and learned about the history of Hawaii's Monarchy being overthrown.  It's definitely not a cheerful history, but is a prime example of how money, power, and greed can lead to disastrous results.  The kids noticed and found it very interesting that the "Dole" name is also a key player in this story as well.

I tried to get a 'real' whole coconut, but Arkansas in February meant that I wasn't able to locate one.  So we ate dried coconut instead, and will save the cracking a whole coconut open experience for another day.

The final part of our meal was Spam Musubi.  If you haven't traveled to Hawaii, or aren't aware of their food culture, this might seem shocking or crazy!  However, as I was telling our kids, this modern quintessential Hawaiian dish is served everywhere; at the 7-11 gas stations, restaurants, and even the Sam's Club Cafe!  Spam's popularity rose during and after World War II, because it was shelf stable, and able to make the long journey to Hawaii without spoiling.  Some Hawaiian chefs in fine restaurants have included Spam on their menu.  I used short grain brown rice, cooked in my Instant Pot at 15 minutes on high pressure, and an onigiri rice mold to form the rice.  I just topped it with a small slice of Spam I had browned in a skillet, and wrapped the whole thing in a seaweed wrap.  I will say that I had several people that were very skeptical about the taste of the Spam Musubi, but everyone actually really thought it was tasty, and had seconds.  President Obama even made the news when he ordered Spam Musubi while golfing in Hawaii!


The natural next discussion was about the history of Spam, which was really quite interesting!

We ended the night watching Moana.  The movie was okay to me, but the graphics were really amazing, and that's not something I usually note or comment on.  The water and scenery were really beautiful!!


Let me know if you have a Moana Meal, and what your family thinks!! Enjoy!

Wednesday, January 4, 2017

Olive Spread


Becca here, with one of my favorite recipes from growing up.  Our Mom would make this Olive Spread just a time or two a year, but it has always been one I looked forward to, so I was excited when she brought it to my last birthday party!  The green olives give it a lot of flavor, the pecans add crunch, and the mayonnaise and cream cheese smooth, creaminess.  We normally have it with wheat thin type crackers, but I ate the leftovers with veggies, and it was just as good!

Olive Spread

6 ounces cream cheese, softened
1/2 cup mayonnaise
1/2 cup chopped pecans
1 cup green olives with pimientos, sliced
2 Tablespoons olive juice, reserved from the green olives
Dash of black pepper

Combine cream cheese and mayonnaise, and mix well.  Stir in remaining ingredients (pecans, olives, olive juice, and black pepper) until combined.  The filling will be slightly mushy at first.  Refrigerate for a few hours to reach spreading consistency.  Keeps well for a week or two in the refrigerator.  Enjoy!!

Wednesday, November 30, 2016

Tasting Rating Fun for Family Night - Monday Funday #1!


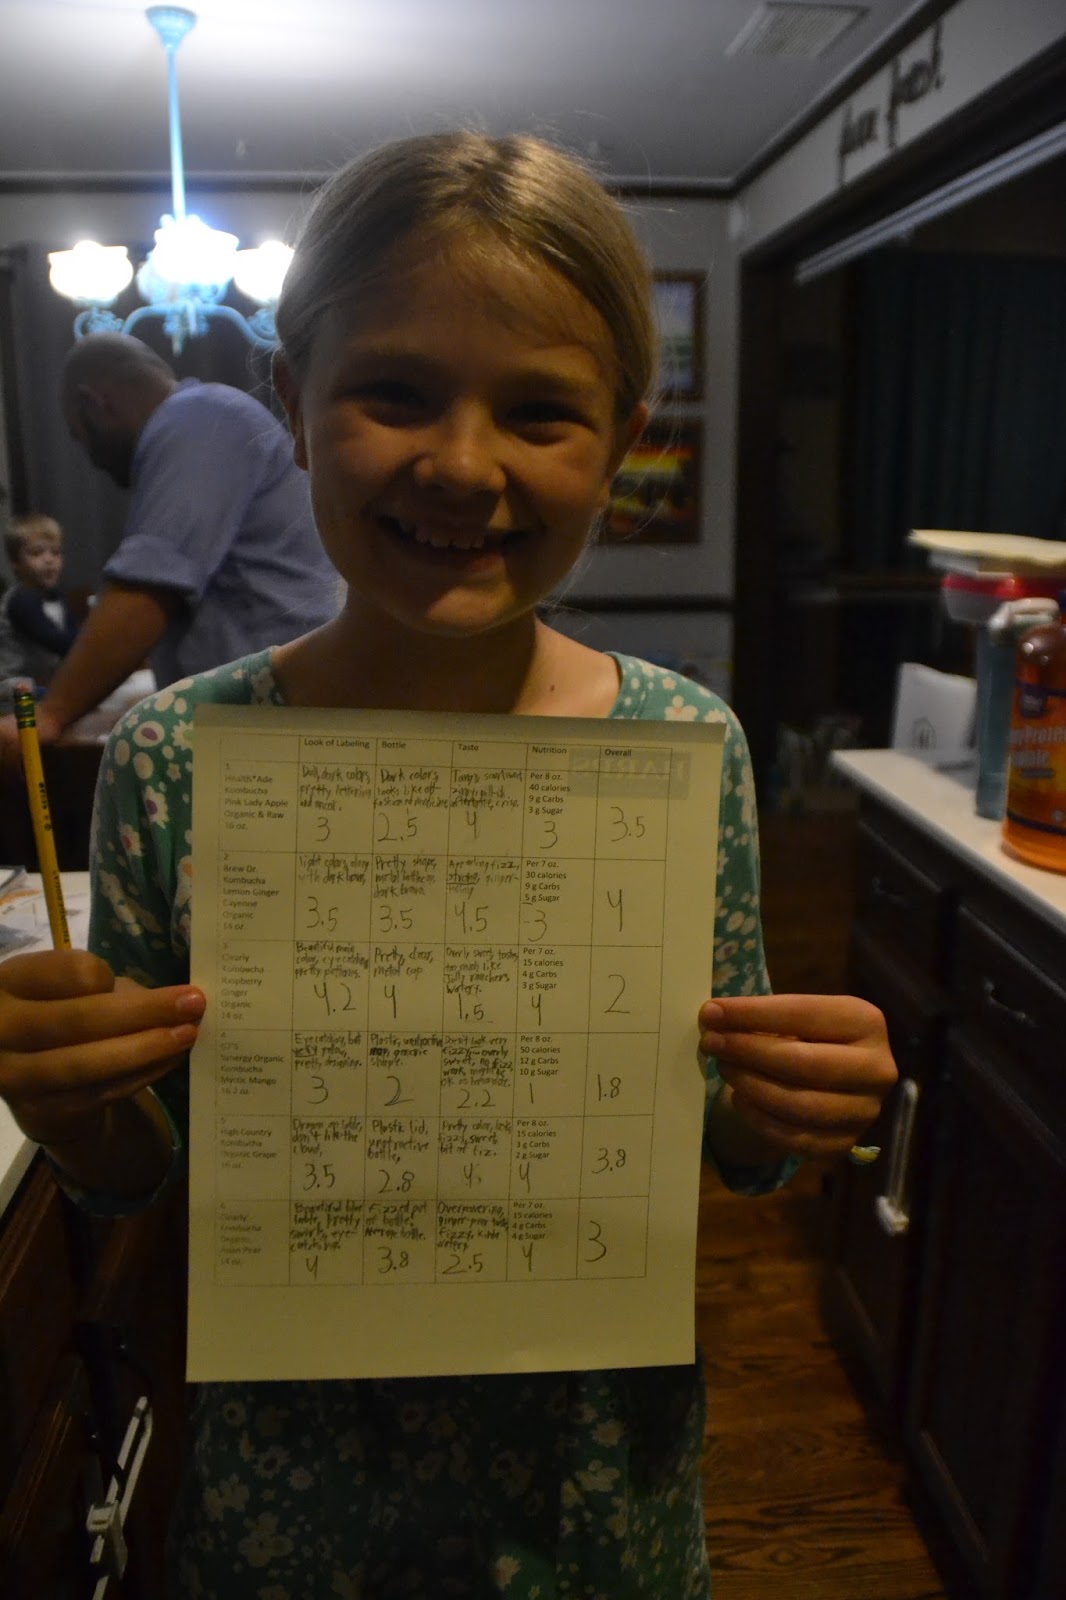
We recently had a fun family activity that I wanted to share!  I (Becca) have five kids, ages two to eleven, so it can be a bit tricky to find something the whole family can participate in and enjoy.  I've been trying to have a small activity to do after dinner, as a family, and this one was a bit hit!  We had a "Tasting Rating" of Kombucha.  You could use any food type that you can get a variety of brands or flavors of, there are lots of fun possibilities!  

For preparation, I visited our local health food store, and bought six different kinds of kombucha.  Then, I just quickly made a chart for us to record our scores on.  I went ahead and typed the name of the kombucha in the first column, since I have several non-readers/writers.  I printed each person in our family a copy, and then we were set to go!  During dinner, I went over the categories and made sure everyone understood the rating system.  We used 1-5, with 5 being the best, and doubled the "taste" category so that it had more weight than the "label", for example.  The categories we used were:  look of labeling, bottle, taste, nutrition, and overall.  I passed out saltine crackers to cleanse our palate between tastings, and we used this set of little cups that is one of my favorite things, to do the tastings in.

Everyone enjoyed the activity a lot, and it was fun to see how different people's tastes reacted either similarly or differently on the different drinks.  The kids had several great suggestions for further tastings, so we plan to do hot teas, potato chips, and chocolates next!  What is your suggestion for a tasting?  Let me know if your family tries it also!


Friday, September 9, 2016

Dairy Free "Buttercream" Icing

 Photo Credit, Sister Sara :)

As I shared in my post earlier this week, a recipe for Dairy Free, 100% Whole Wheat, Chocolate Cake, my youngest son has had some significant health issues that have impacted his eating, so until a few months ago, he was still on formula exclusively, without any safe foods.  For his 1st Birthday, we weren't able to have any kind of cake, I froze his formula into a popsicle shape, because that's all he could have.  So, now that he has a lot of safe foods, we were super excited (ecstatic may be a better word!) to make him his 1st Birthday Cake, for his 2nd Birthday.  I followed this recipe fairly closely, and was happy with the outcome.  The frosting tasted good, and the texture was similar to a buttercream.  I will note, I made the cakes the night before, let them cool, frosted them, and refrigerated them overnight.  I removed them from the fridge a couple of hours before serving, but the coconut oil base, meant that the frosting was a bit more solid than I would have preferred; next time I would take the cakes out of the refrigerator earlier, although no one complained about the icing :)


Dairy Free "Buttercream" Icing

1/2 cup coconut oil, at room temperature (liquid form)
1/2 cup Earth Balance, soy-free, dairy-free butter substitute, softened (in a square tub near the margarine, I purchase at Walmart)
2 teaspoons pure vanilla extract
4 cups powdered sugar (most mainstream brands have cornstarch, look at a health food type store if corn is an issue!)

In a mixer bowl, whip the coconut oil and butter substitute until smooth and creamy, with no lumps remaining.

Add the vanilla extract.

One cup at a time, blending after each addition, add the powdered sugar.

For best results, use immediately.  It may be store in the refrigerator, but will need to be brought to room temperature before icing.  Do not microwave!

Enjoy! Becca

Wednesday, September 7, 2016

Dairy Free, 100% Whole Wheat, Chocolate Cake

Photo credit Sister Sara :)

Becca here, with a recipe that I was super excited to experiment with, and make.  My youngest son has had some significant health issues that impacted his eating, so until a few months ago, he was still on formula exclusively, without any safe foods.  For his 1st Birthday, we weren't able to have any kind of cake, I froze his formula into a popsicle shape, because that's all he could have.  So, now that he has a lot of safe foods, we were super excited (ecstatic may be a better word!) to make him his 1st Birthday Cake, for his 2nd Birthday.  I did a lot of research on cake recipes, since it was important to me that it tasted good, I wanted him to be able to eat the same cake as everyone else, that it was dairy and corn free, and 100% whole wheat.  I settled on a variation of a Crazy Cake, a depression era cake that doesn't use eggs, butter, or milk.  I was really pleased with the way the cake turned out, and several party guests without dietary restrictions commented on how much they enjoyed it also.  I definitely don't think it tasted "healthy" or "dairy free"; it was very moist, and had a great flavor.  An unexpected bonus, was that you actually mix the cake up in the 9x13 pan, so there isn't a mixing bowl to wash also!!

I will be sharing the dairy-free "buttercream" recipe on the blog soon as well.


Dairy-Free, 100% Whole Wheat, Chocolate Cake

3 cups whole wheat flour (I recommend King Arthur brand, or grinding your own, the results are significantly better I think!)
2 cups sugar (I use unbleached, cane sugar)
1 teaspoon salt (I use "Real Salt" or Pink Himalayan)
2 teaspoons baking soda
1/2 cup unsweetened cocoa powder (I like a dark or dutch cocoa powder, and fair trade is important to our family as well)
3/4 olive oil
2 Tablespoons white vinegar
2 teaspoons vanilla extract (we make our own in large batches).
2 cups tap water

Preheat oven to 350 degrees F.

Sift flour, sugar, salt, baking soda, and cocoa powder together in an ungreased, 9x13 glass baking pan.

Make three wells.  Pour oil into one, vinegar into the second, and vanilla into the third.

Pour cold water over everything, and stir well with a fork.  Be sure to scrape the edges and bottom, and make sure it is thorougly mixed.

Bake at 350 for 30-40 minutes, or until toothpick inserted into the center comes out clean.

Store, covered, in the refrigerator.  We thought it tasted just as good, or maybe even better, the second day.

Monday, January 27, 2014

Indoor Picnic


Hi everyone!  Are you staying warm?  I feel like that's the normal question that's being asked over and over around here this winter.  Although one day this week we had warm enough temperatures for a stroll outside and sidewalk chalk, today we are back to the grind of winter.  The cold all day grind.  It sure does have us dreaming of Spring. 

For now, my girls and I have decided to make the merriest of our days inside.  Even with such a positive outlook sometimes it can feel a bit cooped up, can't it? 

I have an idea for you, that is perfect for a your children, a date night, or even a winter birthday party!  An indoor picnic.  This particular day we were stuck in and still in our jammies, but needing something a little extra special.  I had my older daughter go in the other room so I could surprise her and then set up this simple picnic. 

I laid a picnic blanket down that I picked up at the thrift store, clearance paper plates from Target, an artificial flower in a vase I crafted, and stuck some paper butterflies in mini pots, to give the feeling of being outdoors. 

I prepared some simple finger foods to top it all off!  My oldest daughter said "This is neat!!" and both girls really enjoyed themselves. 

I can't wait to hear how you enjoy the merriment of your own indoor picnic! 
Sara 

Monday, November 4, 2013

Porch Party


A Porch Party

 We had a little porch party.  A breakfast for dinner sort of shindig. 
"Let's celebrate just because" is my motto around here and we rocked this party.

 Almond milk, banana muffins (no sugar or butter-woooot), eggs, bacon, hashbrowns, and bananas.


Can you celebrate today, just because?
Go on,
you can do it. :)

Monday, October 21, 2013

Popcorn Party


Raise your hand if you love popcorn!
I would definitely raise two hands to that.  And both feet if I could.  We are popcorn lovers at our house.  We make our own by using simple ingredients-popcorn kernels and a brown paper bag.  Simply put 1/4 cup popcorn kernels in the brown paper bag and heat in the microwave.  I usually let ours pop for about one minute and 55 seconds.  We always add a bit of melted butter and salt to ours afterwards and it is delicious!  

One afternoon we had a popcorn party, Anna and I. 
We popped popcorn, read/talked about two books about corn, and talked about the different parts of an ear of corn.  Anna even decided to peel the ear of corn!  

Later we talked again about all we had learned while decorating a journal page with corn husk stickers and looking at Nana's corn stalks in her garden. 

A teachable, sweet little moment with my gal. 

Monday, October 14, 2013

Apple Party

Take a peek at a little apple party my sis and I had for our kiddos recently!  My girls and I were having a bit of a long week with my husband working a lot so I was trying to think of some fun, fall-themed activities to do.  We are crazy about apples so I thought a little apple party would be fun and easy to pull together.  
I checked out some apple books from the library, we ate a variety of apples, and painted with apples! 
I brought apple butter along too but it didn't end up getting opened. Maybe next time!


 The kids enjoyed stamping with the apples for a few minutes but then generally wanted a cleaner way to paint.  Except for this sweet girl!  She painted her whole entire apples. :)  

I hope you'll have an apple party of your own! 

Monday, September 16, 2013

Apple Place Setting: Autumn is coming!

Does the arrival of autumn have you dreaming of outdoor dinner parties as much as me?  I can just picture a long, rustic table outside (even in your backyard!) filled with simple, yet beautiful place settings and food galore.  Sounds lovely, doesn't it?  I think this place setting would look lovely for an autumn feast and it is very easy to pull together.

For this simple, yet sweet look I folded a cloth napkin and placed it on the white plate.  Next I layered a doily on top (you can buy these at Joanns!).  The apple is a gorgeous one from Wal-Mart, but I'd strongly advise buying local!  Last, I completed the look by tying the silverware together with jute and sprinkling some acorns nearby.

If you end up using this look, or a place setting inspired by this-send us an email at thricethespice@yahoo.com with a picture!  We'd love to see it.

Happy hosting,
Sara :)

Friday, May 24, 2013

Apple/Grape Race Cars


Jana here with a recipe that my young children loved!  I saw this idea in Family Fun magazine,  It is one of the few magazines I receive monthly.  If you watch any money saving blogs (such as Money Saving Mom), they do regular posts on magazine subscriptions that you can get for free.  I signed up for a free subscription to Family Fun magazine, and I love receiving it every month!  I'm pretty particular about what magazines I sign up for, but this one has great craft, recipe, and travel ideas! 

As any of you that have sons know, they are intrigued by 'things that go'!  When I added these apple and grape race cars to my 4 year old son's plate one day at lunch, he was thrilled with them!  He played with them some, and even modified them as he ate to turn them into other things!  ("Now it's a boat!", etc)  I think it's fun to add some creative food ideas to your kids mealtimes once in awhile!  Remember the bear toast I posted a few months ago?  My kids still ask me to make this, and I surprise them with it sometimes! 

All you need to do for the race cars is slice an apple (you could even make different color combinations with red/green/yellow apples, or red/purple/green grapes!).  Using an individual slice, poke a toothpick through each end, towards the bottom. Cut a grape in half, and put a grape on each end of the toothpick to add the 'wheels'!  These would also be really cute as an appetizer at a baby shower or birthday party!  If you use them for an appetizer, I would suggest mixing some lemon water to spray on the apples to keep them from turning brown. 

Enjoy!

Monday, April 29, 2013

DIY Backyard Brunch


Hi everyone!  Do you remember the DIY silverware holders I posted a while back? You can find them here. Today I thought I'd give you a look at the brunch I hosted, where the silverware holders were used!  This was a smallish gathering I held in my back yard on a table made from old fence boards and two sawhorses.  Doesn't get any easier than that!  We gathered chairs from the porch and inside and assembled them around the table.

The table decor was so easy to put together, once I had my ideas in place.  I wrapped the drinking glasses (which were saved from my own kitchen) with chevron duct tape, found in the $1 section at Target.  I used striped straws (also found at Target, on the party aisle) for the glasses as well.  The dishes are my best china, which I received at my wedding.  The centerpiece was a red bud branch cut the night before and placed in a decorated tomato juice can.

The food table was also easy to decorate.  I placed the "Rosy Retreat" (the name of the brunch, the name came from my personal blog The Rosy Life) sign on the chalkboard to be the focal point.  I created height on the table with stacks of books, and the vintage yellow suitcase.

This was a potluck brunch so everyone simply brought their food and placed it on the front of the table!  Easy and delicious. :)

I hope you'll be inspired to try a backyard brunch of your own!
Sara