Showing posts with label dessert. Show all posts

Thursday, January 26, 2017

{Dairy Free} Peach (or any fruit) Cobbler


Becca here with a few modifications to one of my favorite recipes our family makes, and that I have posted on the blog, Peach (or any fruit) Cobbler.  It is one I have made with a variety of fruits, both fresh and frozen, and is my go-to dessert for when we have guests from different countries over for dinner, as cobbler seems quite "American" to me.  Some members of our family are dairy free, and as a family we try to make grains and dairy not the main building blocks of our diet.  We were all excited when we found one last frozen quart bag of peaches from the local orchard we buy from in the summer months, and were able to have one last peach cobbler this year!

{Dairy Free} Peach (or any fruit) Cobbler

4 Tablespoons coconut oil
3/4 cup sprouted whole wheat
3/4 cup coconut sugar
1 teaspoon baking powder
1/4 teaspoon salt
3/4 cup almond or coconut milk
4 cups fresh or frozen (defrosted) fruit, in bite sized pieces.

Place coconut oil into a 9x13 oven safe pan, in the cold oven.  Set oven to preheat to 350, to let the coconut oil melt, while you prepare the other cobbler ingredients.  When coconut oil is melted, remove pan from the oven.

In a small bowl, combine sprouted whole wheat flour, coconut sugar, baking soda, salt, and almond or coconut milk to make a smooth batter.  Pour into the pan with the melted coconut oil in it.

Bake 30-40 minutes, or until batter has risen to the top to form a nice golden brown crust, and fruit is bubbly.  Please note that due to the coconut sugar, and sprouted whole wheat, the cobbler will be a darker color than you are typically used to, like the photo above.

We enjoy it best served warm.  Enjoy!!

Printable Version

Friday, December 2, 2016

Honey Cranberry Upside Down Cake


Becca here, with a recipe that caught my eye while flipping through the December Food Network Magazine.  It was actually on an advertisement for Garnier Hair Products; I tried to track down the recipe online to give credit for my inspiration to someone, but couldn't find it.  I modified the original recipe quite a bit, to make it both more nutritious, and safe for everyone in our family to eat, since all dairy and corn products are an issue for one of our children.

I'm not a huge dessert person typically, but I LOVE this cake.  It has a different taste than I've had before, but one that is absolutely delicious.  It has the complex sweetness of the honey, and the tartness of the cranberries combined, as well as the different textures in the cake and topping. Just one quick note - make sure that you don't leave it in the cake pan more than the 20 minutes specified!  Also, mine sunk a bit in the middle here because I placed it on a regular sloping dinner plate; for a great presentation, it would do best on a completely flat platter.

Honey-Cranberry Upside Down Cake

Topping:
3 Tablespoons coconut oil, plus some for the pan (or coconut oil spray)
1/2 cup honey
1 pinch salt
3 cups fresh or frozen cranberries
the zest of one orange

Cake:
1 1/2 cups whole wheat flour (I use King Arthur, or grind at home from wheat berries)
1 1/2 teaspoons baking powder
1/4 teaspoon baking soda
1/4 teaspoon salt
6 Tablespoons coconut oil, soft or melted
1/4 cup granulated coconut sugar
2 large eggs
2/3 cup honey
3 teaspoons real vanilla extract

Preheat oven to 325 F.  Grease bottom and sides of a 9" circle cake pan with coconut oil, or coconut spray.

In a medium saucepan, place first 3 topping ingredients (coconut oil, honey, and salt).  Bring to a boil, on medium high, stirring occasionally.  Boil for 3 minutes, stirring occasionally, then add the cranberries & orange zest & turn the heat off.

In a large bowl, combine dry cake ingredients (flour, baking powder, baking soda, and salt).

In a separate bowl, whisk coconut oil and coconut sugar until thoroughly combined.  Whisk in eggs, and then honey and vanilla extract.

Whisk the wet ingredients into the dry ingredients, gently, until combined.

Pour warm topping into cake pan, spread evenly.  Pour cake batter on top, and gently spread evenly.

Bake at 325 F for 35-40 minutes.  Let cool in the pan 20 minutes.  Then, gently run a butter knife around the edges of the cake, place a plate or platter on top, and flip it over to remove the cake.

Serve warm, or at room temperature, with whipped cream or ice cream, if desired.  Enjoy!

Friday, September 9, 2016

Dairy Free "Buttercream" Icing

 Photo Credit, Sister Sara :)

As I shared in my post earlier this week, a recipe for Dairy Free, 100% Whole Wheat, Chocolate Cake, my youngest son has had some significant health issues that have impacted his eating, so until a few months ago, he was still on formula exclusively, without any safe foods.  For his 1st Birthday, we weren't able to have any kind of cake, I froze his formula into a popsicle shape, because that's all he could have.  So, now that he has a lot of safe foods, we were super excited (ecstatic may be a better word!) to make him his 1st Birthday Cake, for his 2nd Birthday.  I followed this recipe fairly closely, and was happy with the outcome.  The frosting tasted good, and the texture was similar to a buttercream.  I will note, I made the cakes the night before, let them cool, frosted them, and refrigerated them overnight.  I removed them from the fridge a couple of hours before serving, but the coconut oil base, meant that the frosting was a bit more solid than I would have preferred; next time I would take the cakes out of the refrigerator earlier, although no one complained about the icing :)


Dairy Free "Buttercream" Icing

1/2 cup coconut oil, at room temperature (liquid form)
1/2 cup Earth Balance, soy-free, dairy-free butter substitute, softened (in a square tub near the margarine, I purchase at Walmart)
2 teaspoons pure vanilla extract
4 cups powdered sugar (most mainstream brands have cornstarch, look at a health food type store if corn is an issue!)

In a mixer bowl, whip the coconut oil and butter substitute until smooth and creamy, with no lumps remaining.

Add the vanilla extract.

One cup at a time, blending after each addition, add the powdered sugar.

For best results, use immediately.  It may be store in the refrigerator, but will need to be brought to room temperature before icing.  Do not microwave!

Enjoy! Becca

Wednesday, September 7, 2016

Dairy Free, 100% Whole Wheat, Chocolate Cake

Photo credit Sister Sara :)

Becca here, with a recipe that I was super excited to experiment with, and make.  My youngest son has had some significant health issues that impacted his eating, so until a few months ago, he was still on formula exclusively, without any safe foods.  For his 1st Birthday, we weren't able to have any kind of cake, I froze his formula into a popsicle shape, because that's all he could have.  So, now that he has a lot of safe foods, we were super excited (ecstatic may be a better word!) to make him his 1st Birthday Cake, for his 2nd Birthday.  I did a lot of research on cake recipes, since it was important to me that it tasted good, I wanted him to be able to eat the same cake as everyone else, that it was dairy and corn free, and 100% whole wheat.  I settled on a variation of a Crazy Cake, a depression era cake that doesn't use eggs, butter, or milk.  I was really pleased with the way the cake turned out, and several party guests without dietary restrictions commented on how much they enjoyed it also.  I definitely don't think it tasted "healthy" or "dairy free"; it was very moist, and had a great flavor.  An unexpected bonus, was that you actually mix the cake up in the 9x13 pan, so there isn't a mixing bowl to wash also!!

I will be sharing the dairy-free "buttercream" recipe on the blog soon as well.


Dairy-Free, 100% Whole Wheat, Chocolate Cake

3 cups whole wheat flour (I recommend King Arthur brand, or grinding your own, the results are significantly better I think!)
2 cups sugar (I use unbleached, cane sugar)
1 teaspoon salt (I use "Real Salt" or Pink Himalayan)
2 teaspoons baking soda
1/2 cup unsweetened cocoa powder (I like a dark or dutch cocoa powder, and fair trade is important to our family as well)
3/4 olive oil
2 Tablespoons white vinegar
2 teaspoons vanilla extract (we make our own in large batches).
2 cups tap water

Preheat oven to 350 degrees F.

Sift flour, sugar, salt, baking soda, and cocoa powder together in an ungreased, 9x13 glass baking pan.

Make three wells.  Pour oil into one, vinegar into the second, and vanilla into the third.

Pour cold water over everything, and stir well with a fork.  Be sure to scrape the edges and bottom, and make sure it is thorougly mixed.

Bake at 350 for 30-40 minutes, or until toothpick inserted into the center comes out clean.

Store, covered, in the refrigerator.  We thought it tasted just as good, or maybe even better, the second day.

Friday, June 6, 2014

Gooey Lemon Cake Bars


Jana here with a yummy dessert recipe!  I like to make different forms of cake bars or cookie bars, because they usually make a lot (if you're needing to feed a crowd), and it's easy to pour the batter into the pan and let it bake! (time saver compared to other desserts)  I recently purchased some lemons to use as a table centerpiece, but then needed a lemon recipe to use them in once they were getting to be too ripe. I found a recipe that I followed loosely, and this delicious recipe was made!  The lemon flavor is evident, but not overpowering.

Gooey Lemon Cake Bars

3/4 cup all purpose flour
3/4 cup sugar
1/4 teaspoon salt
1/2 cup butter, softened
2 large eggs
zest from one lemon (about 1 tablespoon)
juice from one lemon (about 2-3 tablespoons)

1. Preheat the oven to 350 degrees.  Grease an 8x8 baking dish.

2. In a mixing bowl, beat the flour, sugar, salt, and butter until combined.  In a separate small bowl, whisk the eggs, lemon zest, and lemon juice.  Pour the egg mixture into the flour mixture, and beat on medium speed for 2 minutes. (mixture should be smooth and creamy)

3. Pour into baking dish, and bake for 25-30 minutes. (should turn golden around the edges)

Enjoy!

Friday, April 25, 2014

Chocolate Chocolate Chip Cookies


Jana here with a recipe that has quickly become my 'go to' cookie recipe!  I found this recipe for Chocolate Chocolate Chip Cookies one day on All Recipes. All Recipes is a great resource if you've never used it. I love reading the reviews people leave on recipes, because it's good to know what the majority of people thought when making something! (so you can make changes accordingly)  These cookies don't have too many ingredients, have a really rich flavor similar to brownies, and are a great crowd pleaser!

Chocolate Chocolate Chip Cookies
*Yield: 2 dozen

1/2 cup butter, softened
1/2 cup sugar
1 egg
1 teaspoon vanilla extract
1 cup all-purpose flour
1/3 cup cocoa powder
1/4 teaspoon baking soda
1/8 teaspoon salt
1/2 cup chocolate chips

1. Preheat oven to 350 degrees.

2. In a large bowl, beat butter, sugar, egg, and vanilla extract until light and fluffy.

3. Combine the flour, cocoa powder, baking soda, and salt in a small bowl.  Stir into the butter mixture until well blended. Mix in the chocolate chips.

4. Drop by rounded teaspoonfuls onto ungreased baking sheet.  Bake for 8-10 minutes, or just until set.

Enjoy!

Friday, March 14, 2014

Chocolate Chip Cookie Bars


Jana here with a dessert recipe that can be made quickly, and feeds a crowd!  (and could even be doubled to feed an even bigger crowd!)  I recently was going to be taking a snack to a group of moms, and needed to have something tasty and easy to grab on the go.  So I found this recipe on the Taste of Home website.  They turned out delicious, and only took a few minutes to mix up!

Chocolate Chip Cookie Bars

1 1/2 cups brown sugar
1/2 cup butter, melted
2 eggs, lightly beaten
1 teaspoon vanilla extract
1 1/2 cups all-purpose flour
1/2 teaspoon baking powder
1/2 teaspoon salt
1 cup (6 ounces) semi-sweet chocolate chips (I used a combination of butterscotch chips and chocolate chips because that was what I had on hand)

1.Preheat oven to 350 degrees. In a large bowl, combine the brown sugar, butter, eggs, and vanilla until just blended. In a separate bowl, combine the flour, baking powder, and salt. Add this to the brown sugar mixture. Stir in the chocolate chips.

2. Spread dough into a greased 9x13 baking dish. Bake for 20-25 minutes, or until a toothpick inserted comes out clean.  After cooling, cut into bars.

Enjoy!

Wednesday, February 12, 2014

Cookies & Cream Fudge


Becca here with a recipe that is super, super, easy and so delicious!  No one will ever guess it take just five minutes to make.  It is really rich, so be sure to cut into small pieces.  I made this for the Bake Sale where my children take homeschool classes, and packaged four pieces in those cellophane bags you can get at Walmart, printed in all kinds of seasonally appropriate prints, for a cute & tasty treat.

Cookies & Cream Fudge

3 cups white chocolate chips
1 can (14 ounces) sweetened condensed milk
3 cups chocolate sandwich cookies, broken into large pieces

Line an 8x8 pan with parchment paper.  Or I used wax paper and it worked fine, it would lift out of the pan easier with parchment though :)

Combine white chocolate chips and sweetened condensed milk in saucepan over low heat on the stove, stirring frequently, until thoroughly melted.  Stir in chocolate sandwich cookies.

Immediately pour mixture into prepared 8x8 pan.  Refrigerate 2 hours or until set. 

Slice and serve!  May be served at room temperature or refrigerated. 

Friday, February 7, 2014

Butterscotch Bars


Jana here with a tasty treat for these cold winter days!  Here in Arkansas, we are having a cold winter (with a few 60 degree days mixed in...our weather is very unpredictable), and have had several snow 'storms'. Anyway, with all of this cold weather, sometimes you just need a comfort snack.  That's where these Butterscotch Bars come in. They are really delicious with a cup of coffee!


Butterscotch Bars

1/2 cup + 2 tablespoons all purpose flour
1/2 teaspoon baking soda
1/2 teaspoon salt
1/2 teaspoon cinnamon
1/4 cup butter
1/4 cup oil
1/4 cup white sugar
1/4 cup packed brown sugar
1 egg
1/2 tsp vanilla extract
1 1/2 cups quick oats
3/4 cup butterscotch chips

Preheat oven to 375.
Mix butter, oil, sugars, egg and vanilla in a large bowl.  In another bowl mix flour, baking soda, salt, and cinnamon.  Gradually add flour mixture to butter and sugar mixture.
Mix in oats and butterscotch chips.  Spread in a greased 8x8 pan and bake at 375 for 16 - 20 minutes.
Enjoy!

Wednesday, January 29, 2014

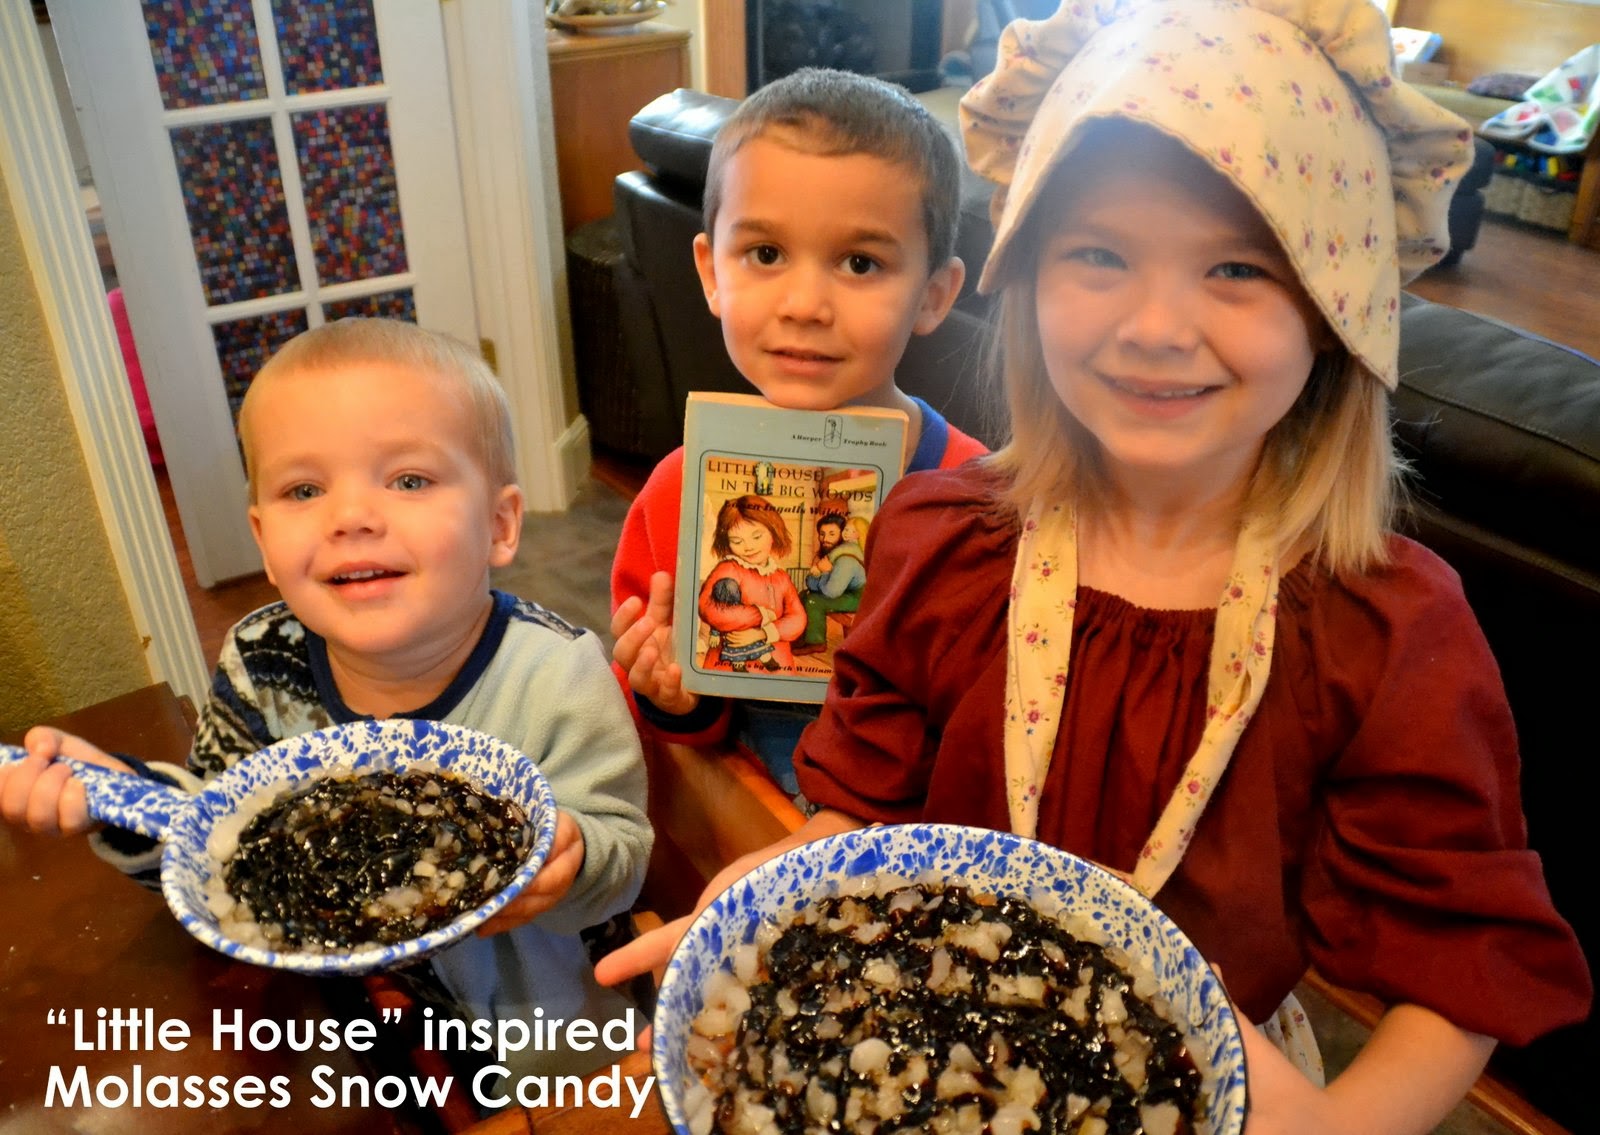
"Little House in the Big Woods" by Laura Ingalls Wilder inspired Molasses Snow Candy

Becca here with a fun winter recipe!  I am reading Laura Ingalls Wilder's "Little House in the Big Woods" to my children again right now, and we decided to try making the molasses on snow candy that they describe making in Chapter 4.  The basic instructions in the book are given; Ma boiled molasses and sugar together to make a syrup, which the girls poured onto fresh snow in pans to let harden and cool.  They got to eat one piece each, and then the rest was saved for Christmas!  I found a more detailed recipe in "The World of Little House", and have elaborated on that below in my own instructions.  My kids thought it was really neat to make something just like Laura and Mary, and the end result has a rich, chewy but creamy texture that really is delicious!  If you have extra molasses, they are also used in these Hearty Healthy Breakfast Cookies that received lots of good reviews from my kids as well as other people's, and these {Best Ever} Molasses Cookies that are a new family favorite of ours!

There is also a really neat Virtual Field Trip here to all of the "Little House" home sites! 


You will need a candy thermometer for this recipe. (Pioneer Laura dress & bonnet are optional :)  I know, the candy thermometers make me nervous too, but my (8 year old) daughter actually made this recipe 99% by herself and it turned out great, so this is a great beginner candy thermometer recipe.  Mine is a really inexpensive one from Walmart, and I think this is the first or second time I've ever used it.

Molasses Snow Candy

1 cup molasses
1 cup brown sugar

Combine molasses and brown sugar in a medium saucepan.  The candy will bubble and rise up in the pan quite a bit once it starts heating up, so don't use your smallest saucepan!

Stir well to combine.  Then clip candy thermometer onto the side.  Slide it in the bracket until the tip is submerged, but NOT touching the bottom of the pan.

Turn heat on to low, and stir fairly consistently until temperature reaches the "hard crack" line on your candy thermometer, at 300 F. 

Meanwhile, start filling a couple of 9x13 pans with crushed ice.  I had my two boys doing this, while my daughter stirred, and they completed right about the same time.  Feel free to use snow instead of you have some good clean snow!

Quickly pour the (incredibly hot, this part is definitely for an adult!) mixture from the saucepan into a glass liquid measuring cup.  (I used a 2 cup Pyrex glass measuring cup & it was the perfect size).

Drizzle the (reminder again, this is scalding hot!) molasses over the ice.  I let my daughter pour by herself, but my sons held my hand as I poured to help.  And the baby sat in her highchair & watched :) 

It will harden pretty immediately as it cools.  As soon as it does, remove from the ice onto wax paper, removing any chunks of ice that might be sticking.  Enjoy!

Wednesday, January 22, 2014

{Best Ever} Molasses Cookies (and Giveaway Winner Announcement!)


First, this post is a bit later than usual because I have the winner for the giveaway we hosted last week for Nourish pouches.  I used Random.org to select a winner from the comments, and the winner was "Casey and Bekah" so please email your mailing address to thricethespice@yahoo.com so we can get your pouches in the mail!  Now on to today's (yummy!) recipe!

Becca here with a really delicious recipe that is soon to become a family favorite!  I had a jar of molasses I was wanting to use up, and thought about molasses cookies.  I hadn't had them in many years and, although our Mom used to make them, I'm not sure if I ever had.  I actually based this recipe off of one from a kids' "clean eating" cookbook we had checked out from the library, but I can't remember the title of it now.  The cookies are just the perfect blend of chewy with a little bit of a crunch to them.  I bake them on a baking mat (like a silpat) and use a cookie scoop so that they are uniform in shape and bake evenly (plus, they're super quick to form that way, no sticky hands required!)  I hope you'll give these cookies a try, my oldest daughter said that they were some of the best cookies I've ever made :)  I like to make extra cookie balls and freeze them to have on hand for a quick (and easy to portion size since I can just bake a few) treat.  Just defrost in the refrigerator overnight or the counter until they're a bit soft, and not hard as a rock and then proceed with baking instructions :)  Enjoy!

Molasses Cookies

1 1/2 sticks butter, softened
1 cup sugar
1 large egg
1/4 cup molasses
1 teaspoon vanilla extract
2 cups flour (original recipe called for 1/2 whole wheat, 1/2 all-purpose; I use all spelt flour I grind)
2 teaspoons baking soda
1 teaspoon ground cinnamon
1/2 teaspoon ground ginger
1/2 teaspoon salt
1/2 teaspoon ground cardamom (optional, use it if you have it, it adds a good depth of flavor, but it's pretty pricey, don't buy it just for this!)


Preheat oven to 350.  Mix butter and sugar in a bowl until smooth and creamy.

Add egg, molasses, and vanilla and mix well.

Add flour, baking soda, cinnamon, ginger, and salt (and cardamom, if desired). 

Form cookies into balls about 1" round.  I use a cookie scoop for this, and it works great!

Place balls onto a baking sheet about 2" apart.  Bake for about 12 minutes, just until the cookie has started to set, and maybe slightly darken around the edges.  Enjoy!

Friday, January 17, 2014

Snowball Cookies


Jana here with a fun recipe that many of you may know as Mexican Wedding Cookies.  When my kids and I were making them recently, it was a snowy day, so we decided to call them Snowball Cookies!  These only have a few simple ingredients, are so easy to make, and are a yummy treat!  The texture is different from 'regular cookies', so I like to make them to take to a get-together for something unique!

Mexican Wedding Cookies

1/2 cup (1 stick) butter, softened
1/2 cup powdered sugar, divided
1/2 teaspoon vanilla extract
1 cup flour
1/2 cup finely chopped pecans

1. Preheat oven to 350 degrees.  Beat butter, half of the powdered sugar, and vanilla in a large bowl with mixer until light and fluffy.

2. Gradually add flour and pecans, beating until well blended.

3. Shape dough into 1 inch balls, and place on ungreased baking sheets.

4. Bake 13-15 minutes, or until bottoms are lightly browned. Cool 5 min on baking sheets. Roll warm cookies in remaining powdered sugar until evenly coated.

Enjoy!

Monday, December 30, 2013

Burnt-Sugar Cake


Hi everyone!  How was your Christmas?  I hope you enjoyed the time with family and friends.  If you're like us, you just might have birthdays close to the holidays.  They can get so overlooked in my opinion, but it doesn't make them any less special! (In fact, our very own Thrice the Spice gal Rebecca had a birthday this month!) 

My husband also celebrated a birthday earlier this month and I decided to make him a real cake.  Not a pour, dump, and stir out of a bag cake.  It was delicious and worth every bit of time spent.  Perhaps a new year's goal could be to bake more. 

Burnt-Sugar Cake with Burnt-Sugar Frosting

Syrup:
2/3 cup sugar
2/3 cup boiling water

Cake:
½ cup butter, softened
1 and ½ cups sugar
1 tsp vanilla
2 eggs
2 and ½ cups cake flour
3 tsp baking powder
½ tsp salt
¾ cup cold water
3 TB burnt sugar syrup

Preheat oven to 375 degrees. 
To make the syrup, in a heavy skillet, heat sugar over low heat, stirring constantly, until it melts and becomes dark brown.  Slowly add boiling water.  Stir until dissolved.

To make the cake, in a medium bowl cream butter and sugar.  Add vanilla and eggs and beat well.  In a separate bowl, mix together flour, baking powder, and salt.  Add dry ingredients to the egg mixture, alternately with the water, beating until smooth.  Add 3 TB of the burnt sugar syrup and beat for 5 minutes at medium speed.  Pour into two 9-inch greased cake pans and bake for until 20 minutes or until a toothpick inserted in the center comes out clean.  Cool 10 minutes in the pans, then turn onto cake racks and cool completely.

*A note on the frosting recipe below*
I didn't have a double boiler, so I put a saucepan of boiling water on the stove and then set a glass bowl on top of that.  I stirred and beat the frosting mixture by hand, hoping to see beautiful frosting peaks.  It never happened!  So, rather than admit defeat (especially after not using the proper tools), I poured the liquid frosting like syrup over the cake.  It was still delicious! 

Burnt-Sugar Frosting
2 egg whites, at room temperature
1 and ¼ cups brown sugar
3 TB burnt sugar syrup
¼ cup cold water
Pinch of salt
1 tsp vanilla

Combine egg whites, brown sugar, water, sugar syrup, and salt and beat one minute to blend.  Pour into the top of a double boiler and cook, beating constantly, until frosting forms stiff peaks, about 7 minutes.  Don’t overcook.  Remove the top of the double boiler to cool the surface.  Add vanilla and beat until frosting reaches spreading consistency, about 2 minutes. 

Happy eating,
Sara 


Friday, December 13, 2013

Baked Vanilla Custard


Jana here with a recipe that was something new for our family to try!  We have had frozen custard before, but had never had warm, baked custard at home.  Although the texture was something different for the kids to get used to, my husband and I thought it was a yummy treat!  It's not overly sweet, but it is a delicious flavor that would pair well with coffee. The recipe came from the Incredible Egg website.

Baked Custard

3 cups milk
4 eggs
1/2 cup sugar
1 1/2 teaspoons vanilla extract
1/4 teaspoon salt
cinnamon and nutmeg to sprinkle on top

1. Heat oven to 350 degrees.  Heat milk in small saucepan until very hot. (milk should be steaming, but not bubbling)  Meanwhile, beat eggs, sugar, vanilla extract, and salt in medium bowl until blended, but not foamy. Slowly stir in hot milk.

2. Place 6 slightly greased 6 ounce baking dishes (ramekins) in baking dish large enough to hold all cups without touching each other or sides of the pan. Pour egg mixture into cups, divinding evenly. Sprinkle with cinnamon and nutmeg if desired.

3. Place pan on a rack in the center of a 350 degree oven. Pour very hot water into the pan (creating a hot water bath) to within 1/2 inch of top of cups.  Bake until knife inserted in center of cups comes out nearly clean, 25-30 minutes. (Center will still be soft.) Remove cups from the oven, and place on a wire cooling rack for 5-10 minutes. Serve warm, or refridgerate until cool.

Enjoy!

Friday, November 29, 2013

Apple Pie Filling


Jana here with a yummy recipe for Apple Pie Filling!  This can obviously be used to make a homemade apple pie, but there are many other uses too!  Have any of you ever purchased the apple pie filling in a can?  It's tasty, but this is SO much better!  It will be worth your time to make this.  You could use it as a topping for pancakes or waffles, for a delicious treat on top of ice cream, or in any recipe that calls for apple pie filling. 

Apple Pie Filling

8 medium apples
3/4 cup brown sugar
1/2 cup white sugar
1 tablespoon cinnamon
3 tablespoons butter
2 tablespoons flour
water

1. Peel, core, and slice the apples.  Cover with water in a large pot, and heat to boiling.  Then, add 1 tablespoon of butter.

2. Cook the apples until they begin to show slight transparency.  Once this has happened, pour the apples through a strainer, making sure to catch the liquid.

3. Put the liquid back in the pot, and add the sugars and cinnamon.  In a small saucepan, melt the remaining butter. Once melted, whisk in the flour until smooth.  Ladle some of the sugar mixture into the butter/flour, and stir to combine.  Allow this to cook for a couple of minutes to thicken, and then pour back into the large pot. 

4. Add the apples back into the large pot, stirring to combine.

Enjoy!

Friday, November 15, 2013

Pumpkin Chocolate Chip Cake Bars


Jana here with a dessert that is perfect for a Fall gathering!  These Pumpkin Chocolate Chip Cake Bars are pretty rich, so they are the perfect treat to serve at a party where there are lots of people to help eat them.  :)  I  used the full amount of chocolate chips that the original recipe called for, but I think it could have easily just used half of a bag instead of a full 12 ounce bag.  Either way, these cake bars are super moist, very flavorful, and will be a hit anywhere you take them!

Pumpkin Chocolate Chip Cake Bars

2 cups all purpose flour
1 teaspoon cinnamon
1/4 teaspoon allspice
1/4 teaspoon nutmeg
1 teaspoon baking soda
3/4 teaspoon salt
1 cup butter, at room temperature
1 cup granulated sugar
1 large egg
2 teaspoons vanilla extract
1 cup canned pumpkin puree (not pumpkin pie filling)
1/2 or 1 bag semi sweet chocolate chips (6-12 ounces)

1. Preheat oven to 350 degrees. Grease a 9x13 inch baking dish.

2. Using a mixer, beat the sugar and butter until smooth. Add egg and vanilla, and mix until combined. Add pumpkin puree and mix well. (the mixture will have a 'curdled' look to it...this is normal)

3. In a medium bowl, combine the flour, cinnamon, allspice, nutmeg, baking soda, and salt.  Add these dry ingredients to the mixing bowl, and mix on low speed just until combined.  Fold in chocolate chips.

4. Spread batter evenly into the greased pan. Bake for 35-40 minutes. Bars will begin to brown, and a toothpick should be able to be inserted and come out without batter when done.

*Allow to completely cool before cutting and removing from pan.

Enjoy!

Wednesday, October 16, 2013

Apple Cake


Becca's friend, April here again- but this time with a little less 'weird' recipe than the Slow Cooker Cheeseburger Soup I shared last time.  Fall is unofficially here with the passing of Labor Day weekend and the re-release of Starbucks Pumpkin Spice lattes, and I have the perfect fall treat for you:  Fresh Apple Cake!!!  For my hubby's birthday this year he requested this cake that his momma used to make for him.  Is there anyone out there besides me who has a mother-in-law that is an amazing cook/baker/woman? I am sure there are and here is my advice...Don't be threatened by them, learn from them!  I am blessed by my 'Mamacita'.  She is always willing to share recipes with me and help me out with cooking dilemmas.    
 
 
Fresh Apple Cake
3 cups flour
2 cups sugar
1 tsp salt
2 tsp baking soda
2 tsp cinnamon
4 cups diced apples (I used Braeburn, but any baking apple would be fine)
1 cup pecans (optional, but very good with them!)
1 cup oil
2 beaten eggs
 
Sift together dry ingredients.  Add apples, oil, and eggs.  (Batter will be dry) 

Bake in Bundt pan 1 hour at 350 degrees.
 
*Note from Becca - we had this at April's house and it was so yummy, even though I'm not a big cake person normally at all, I asked her to share the recipe!  When I "had" to make the cake to get a picture to go with the recipe, I used hard wheat I ground ("whole wheat"), coconut oil, organic cane sugar, and local jonagold apples and it turned out well also!


Friday, October 4, 2013

"Moon Cake"


Jana here with a recipe that is a great learning activity for your children!  This is my first year to homeschool (my son turned 5 this summer), and we are using the My Father's World curriculum this year. When we had a unit on the moon, there was a recipe at the back that you could use to make a 'moon cake'.  My older two children (ages 5 and 3) love to help in the kitchen, so I knew this would be a great activity!  Not only did they love helping (it has you make 'craters' in the 'moon sand', make a small 'volcano', etc as you mix the ingredients), but the end result was super tasty as well! 

Moon Cake

1 1/2 cups flour
1/2 cup brown sugar
1/2 cup sugar
1 teaspoon salt
5 tablespoons oil
1 teaspoon baking soda
1 teaspoon vanilla
1 tablespoon vinegar
1 cup milk
3/4 cup raisins (optional)

1. Preheat oven to 350 degrees.  Grease a 9" round cake pan.

2. Mix 'moon sand' right in the pan. (flour, brown sugar, sugar, and salt)

3. Form 3 craters in the moon - one large, one medium, and one small.  Add oil to large crater, baking soda to medium crater, and vanilla to small crater.

4. Pour vinegar into the medium crater and watch it bubble like a volcano.  When the volcano stops, add 1 cup milk.  Mix everything together to form the moon's surface. 

5. Optional: Press 3/4 cup raisins ('moon rocks') into the batter.

6. Bake at 350 degrees for 25-30 minutes or until toothpick in the center comes out clean.  When cool, sprinkle with powdered sugar ('moon dust')

Friday, September 27, 2013

Brownie in a Cup (Quick & Yummy!)


Jana here with a single serving brownie recipe that will satisfy your sweet tooth!  Recently, I was really wanting something sweet, specifically chocolate!  I searched the pantry, but couldn't find anything. After a quick Google search, I came across this recipe on a food blog, Number 2 Pencil.  It only took minutes to mix this up in a coffee cup, under a minute in the microwave, and I had a delicious brownie!  I didn't have any chocolate chips on hand, so I left those out. I thought it was still really great, and an easy way to satisfy a sweet craving!

Brownie in a Cup

2 tablespoons butter
2 tablespoons sugar
1 firmly packed tablespoon brown sugar
1/4 teaspoon pure vanilla extract
pinch of salt

1 egg yolk
4 tablespoons flour
1 tablespoon unsweetened cocoa powder
2 tablespoons semi sweet chocolate chips (optional)

1. Melt butter in a microwave safe cup or mug.

2. Stir together butter, sugars, vanilla, and salt.

3. Stir in egg yolk. (only the yolk!)

4. Add flour and cocoa powder, and stir again until well combined. (add chocolate chips is using)

5. Cook for about 45 seconds in the microwave. Watch closely, don't overcook.

Enjoy!

Wednesday, September 18, 2013

3-Ingredient Peanut Butter Cookies {gluten & dairy free}


Becca here with a recipe that I'm sure will become a regular in your family's treat rotation!  In fact, as I was making these the other day, I thought I'd double check and make sure that I had posted the recipe, and was shocked to see that I hadn't yet! 

By the way, if you haven't checked out our 'search' box, you're missing out!  It is just under the "About the Sisters" on the right sidebar, and you can search by ingredient, recipe title, keyword, etc., making it super convenient to find what you're looking for, it's my most-often-used feature of our website! 

Back to the recipe, I've been making it for many years, it's super convenient, and makes a perfect sized amount of cookies, an even dozen.  The cookies have a great texture, you would never guess that they are made with just 3 ingredients and are flourless.  It's also a great recipe to have kids help with, since there are only three ingredients that are easy to remember and measure, and even the youngest ones can help making the crisscross marks with a fork and sprinkling sugar on top!  I use organic no sugar added (100% peanuts only) peanut butter, so I think other nut or seed butters (such as almond or sunflower) would yield a good result also, as several readers have reported great results with these peanut-free substitutions in the always popular Breakfast Cookies and Powerballs.  Enjoy!

1 cup peanut butter (I use organic, 100% peanuts, no sugar added)
1 cup sugar (I use free trade organic)
1 large egg
Additional Sugar for sprinkling on top, optional

Preheat oven to 350.

In a large bowl, stir all ingredients well to combine thoroughly.

Drop by large spoonfuls onto silpat or parchment paper lined cookie sheet.  I usually make 12.

Use a fork to smash down in perpendicular directions to get the classic crisscross look and flatten the cookies a bit.

Sprinkle with sugar, if desired.

Bake at 350 for just 6-8 minutes, or until edges are just barely starting to turn a light golden brown.  You don't want to overbake or get an actual browning going, they get dry and crumbly that way. 

Enjoy!